RendererFeatureでMRT(Multiple Render Target)
- 2022.03.06
- Unity
- shader, script, post process

通常は一つのレンダーターゲットに対して描画を行います。これに対し、MRT(Multiple Render Target)では複数のレンダーターゲットへ一度に描画することができます。このMRTをRenderFeature内でCommandBufferを使用して実行します。これは、Library¥PackageCache¥com.unity.render-pipelines.universal@7.7.1¥Runtime¥PassesにあるPostProcessPass.cs内のDoGaussianDepthOfFieldで使用されています。これを参考にScriptとShaderを作成し、MRTが実行できるか確認をしました。
Shader
MRTを実行するためのShaderは以下の通りです。通常、フラグメントシェーダーの戻り値はfixed4やfloat4などのベクトル型ですが、MRT用のShaderではフラグメントシェーダーの戻り値として複数のベクトル型の変数を持つstruct使用します。このShaderではMainTexをグレースケール化した結果とグレースケールを反転した結果を出力します。
|
1 2 3 4 5 6 7 8 9 10 11 12 13 14 15 16 17 18 19 20 21 22 23 24 25 26 27 28 29 30 31 32 33 34 35 36 37 38 39 40 41 42 43 44 45 46 47 48 49 50 51 52 53 54 55 56 57 58 59 60 61 62 63 64 65 66 67 68 69 70 71 72 73 74 75 76 77 78 79 |
Shader "Hidden/Karakan/PostProcessing/MRT" { SubShader { Tags { "RenderType"="Opaque" } Cull Off ZWrite Off ZTest Always Pass { HLSLPROGRAM #pragma vertex vert #pragma fragment frag #pragma target 3.5 #include "Packages/com.unity.render-pipelines.universal/ShaderLibrary/Core.hlsl" #include "Packages/com.unity.render-pipelines.universal/ShaderLibrary/UnityInput.hlsl" struct appdata { float4 vertex : POSITION; float2 uv : TEXCOORD0; }; struct Varyings { float2 uv : TEXCOORD0; float4 vertex : SV_POSITION; }; struct output { float4 color0 : COLOR0; float4 color1 : COLOR1; }; CBUFFER_START(UnityPerMaterial) TEXTURE2D(_MainTex); SAMPLER(sampler_MainTex); float4 _MainTex_ST; TEXTURE2D(_PrimaryTex); SAMPLER(sampler_PrimaryTex); float4 _PrimaryTex_ST; TEXTURE2D(_SecondaryTex); SAMPLER(sampler_SecondaryTex); float4 _SecondaryTex_ST; CBUFFER_END Varyings vert (appdata v) { Varyings o; o.vertex = TransformObjectToHClip(v.vertex.xyz); o.uv = TRANSFORM_TEX(v.uv, _MainTex); return o; } output frag (Varyings i) { output o; float4 col_main = SAMPLE_TEXTURE2D(_MainTex, sampler_MainTex, i.uv); float4 col_grayscale; col_grayscale.rgb = col_main.r * 0.2126 + col_main.g * 0.7152 + col_main.b * col_main.b * 0.0722; col_grayscale.a = col_main.a; o.color0 = col_grayscale; o.color1 = 1.0 - col_grayscale; return o; } ENDHLSL } } } |
以下はMRTの結果を確認するためのShaderです。二つのテクスチャを左右に分けて表示します。
|
1 2 3 4 5 6 7 8 9 10 11 12 13 14 15 16 17 18 19 20 21 22 23 24 25 26 27 28 29 30 31 32 33 34 35 36 37 38 39 40 41 42 43 44 45 46 47 48 49 50 51 52 53 54 55 56 57 58 59 60 61 62 63 |
Shader "Hidden/Karakan/PostProcessing/Combine" { SubShader { Tags { "RenderType"="Opaque" } Cull Off ZWrite Off ZTest Always Pass { HLSLPROGRAM #pragma vertex vert #pragma fragment frag #include "Packages/com.unity.render-pipelines.universal/ShaderLibrary/Core.hlsl" #include "Packages/com.unity.render-pipelines.universal/ShaderLibrary/UnityInput.hlsl" struct appdata { float4 vertex : POSITION; float2 uv : TEXCOORD0; }; struct Varyings { float2 uv : TEXCOORD0; float4 vertex : SV_POSITION; }; CBUFFER_START(UnityPerMaterial) TEXTURE2D(_PrimaryTex); SAMPLER(sampler_PrimaryTex); float4 _PrimaryTex_ST; TEXTURE2D(_SecondaryTex); SAMPLER(sampler_SecondaryTex); float4 _SecondaryTex_ST; CBUFFER_END Varyings vert (appdata v) { Varyings o; o.vertex = TransformObjectToHClip(v.vertex.xyz); o.uv = TRANSFORM_TEX(v.uv, _PrimaryTex); return o; } float4 frag (Varyings i) : SV_Target { float4 col_prim = SAMPLE_TEXTURE2D(_PrimaryTex, sampler_PrimaryTex, i.uv); float4 col_second = SAMPLE_TEXTURE2D(_SecondaryTex, sampler_SecondaryTex, i.uv); float t = step(0.5, i.uv.x); float4 col = col_prim * (1.0 - t) + col_second * t; return col; } ENDHLSL } } } |
Script
Scriptは以下の通りです。
|
1 2 3 4 5 6 7 8 9 10 11 12 13 14 15 16 17 18 19 20 21 22 23 24 25 26 27 28 29 30 31 32 33 34 35 36 37 38 39 40 41 42 43 44 45 46 47 48 49 50 51 52 53 54 55 56 57 58 59 60 61 62 63 64 65 66 67 68 69 70 71 72 73 74 75 76 77 78 79 80 81 82 83 84 85 86 87 88 89 90 91 92 93 94 95 96 97 98 99 100 101 102 103 104 105 106 107 108 109 110 111 112 113 114 115 116 117 118 119 120 121 122 123 124 125 126 127 128 129 130 131 132 133 134 135 136 137 138 139 140 141 142 143 |
using UnityEngine; using UnityEngine.Rendering; using UnityEngine.Rendering.Universal; public class MrtRenderPassFeature : ScriptableRendererFeature { class MrtRenderPass : ScriptableRenderPass { const string _render_tag = "MrtRenderPass"; RenderTargetIdentifier _currentTarget; int _dest_01_id = Shader.PropertyToID("_MrtTempTexture01"); int _dest_02_id = Shader.PropertyToID("_MrtTempTexture02"); int _depth_id = Shader.PropertyToID("_MrtTempTexture03"); //shader property id int _prop_id_main = Shader.PropertyToID("_MainTex"); int _prop_id_primary = Shader.PropertyToID("_PrimaryTex"); int _prop_id_secondary = Shader.PropertyToID("_SecondaryTex"); Material _mat_mrt, _mat_comb; Mesh _screen_mesh; public MrtRenderPass() { _mat_mrt = CreateMaterial("Hidden/Karakan/PostProcessing/MRT"); _mat_comb = CreateMaterial("Hidden/Karakan/PostProcessing/Combine"); } Material CreateMaterial(string path) { Shader shader = Shader.Find(path); if (shader == null) { Debug.LogError("Shader not found."); return null; } Material mat = new Material(shader); if (mat == null) { Debug.LogError("Material has not been created."); return null; } return mat; } public override void Execute(ScriptableRenderContext context, ref RenderingData renderingData) { if (_mat_mrt == null) { Debug.LogError("Material has not been created."); return; } if (!renderingData.cameraData.postProcessEnabled) return; CommandBuffer cmd = CommandBufferPool.Get(_render_tag); cmd.name = "MRT Buffer"; Render(cmd, ref renderingData); context.ExecuteCommandBuffer(cmd); CommandBufferPool.Release(cmd); context.Submit(); } void Render(CommandBuffer cmd, ref RenderingData renderingData) { int width = renderingData.cameraData.camera.scaledPixelWidth; int height = renderingData.cameraData.camera.scaledPixelHeight; cmd.GetTemporaryRT(_dest_01_id, width, height, 0, FilterMode.Bilinear, RenderTextureFormat.ARGBFloat); cmd.GetTemporaryRT(_dest_02_id, width, height, 0, FilterMode.Bilinear, RenderTextureFormat.ARGBFloat); cmd.GetTemporaryRT(_depth_id, width, height, 0, FilterMode.Bilinear, RenderTextureFormat.ARGBFloat); RenderTargetIdentifier[] buffers = { new RenderTargetIdentifier(_dest_01_id), new RenderTargetIdentifier(_dest_02_id) }; cmd.SetGlobalTexture(_prop_id_main, _currentTarget); cmd.SetGlobalTexture(_prop_id_primary, _dest_01_id); cmd.SetGlobalTexture(_prop_id_secondary, _dest_02_id); cmd.SetViewProjectionMatrices(Matrix4x4.identity, Matrix4x4.identity); //2Dとして描画 cmd.SetViewport(renderingData.cameraData.camera.pixelRect); cmd.SetRenderTarget(buffers, _depth_id); cmd.DrawMesh(ScreenMesh(), Matrix4x4.identity, _mat_mrt); cmd.SetViewProjectionMatrices(renderingData.cameraData.camera.worldToCameraMatrix, renderingData.cameraData.camera.projectionMatrix); cmd.Blit(null, _currentTarget, _mat_comb); cmd.ReleaseTemporaryRT(_dest_01_id); cmd.ReleaseTemporaryRT(_dest_02_id); cmd.ReleaseTemporaryRT(_depth_id); } public void Setup(in RenderTargetIdentifier currentTarget) { _currentTarget = currentTarget; } public Mesh ScreenMesh() { if (_screen_mesh != null) return _screen_mesh; _screen_mesh = new Mesh { name = "Screen Mesh" }; _screen_mesh.SetVertices(new Vector3[] { new Vector3(-1.0f, -1.0f, 0.0f), new Vector3(-1.0f, 1.0f, 0.0f), new Vector3( 1.0f, -1.0f, 0.0f), new Vector3( 1.0f, 1.0f, 0.0f), }); _screen_mesh.SetUVs(0, new Vector2[] { new Vector2(0.0f, 0.0f), new Vector2(0.0f, 1.0f), new Vector2(1.0f, 0.0f), new Vector2(1.0f, 1.0f), }); _screen_mesh.SetIndices(new int[] { 0, 1, 2, 2, 1, 3 }, MeshTopology.Triangles, 0, false); _screen_mesh.UploadMeshData(true); return _screen_mesh; } } MrtRenderPass m_ScriptablePass; public override void Create() { m_ScriptablePass = new MrtRenderPass(); m_ScriptablePass.renderPassEvent = RenderPassEvent.AfterRenderingTransparents; } public override void AddRenderPasses(ScriptableRenderer renderer, ref RenderingData renderingData) { m_ScriptablePass.Setup(renderer.cameraColorTarget); renderer.EnqueuePass(m_ScriptablePass); } } |
以下の部分でMRTを行っています。SetRenderTargetによって複数のレンダーターゲットを設定します。そして、スクリーンに広がるメッシュをMRT用のマテリアルで描画することで複数のレンダーターゲットへ描画できます。
|
1 2 3 4 5 |
cmd.SetViewProjectionMatrices(Matrix4x4.identity, Matrix4x4.identity); //2Dとして描画 cmd.SetViewport(renderingData.cameraData.camera.pixelRect); cmd.SetRenderTarget(buffers, _depth_id); cmd.DrawMesh(ScreenMesh(), Matrix4x4.identity, _mat_mrt); cmd.SetViewProjectionMatrices(renderingData.cameraData.camera.worldToCameraMatrix, renderingData.cameraData.camera.projectionMatrix); |
実行結果
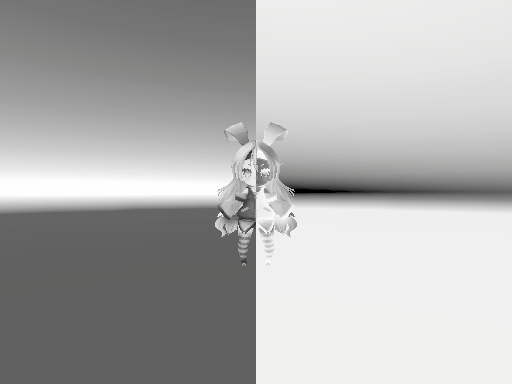
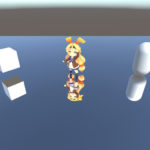
上記のScriptを実行した結果は以下の通りです。MRTによって一度に複数のレンダーターゲットに描画できていることが確認できました。

このコンテンツはユニティちゃんライセンス条項の元に提供されています
-
前の記事
EditorでAnimatorの再生 その2 2021.04.09
-
次の記事

CustomVolumeParameterとインスペクターのエディタ拡張(Volume Component) 2023.03.21



コメントを書く