ラジオボタンの作成(Editor拡張)

EditorWindowでラジオボタンを作成する方法です。
GUILayout.SelectionGridを用いて作成
GUILayout.SelectionGridは選択したボタンのインデックスを返します。動作としてはラジオボタンと同じですが、実行すると

このように、複数のボタンが並んだ状態で表示されます。このGUILayout.SelectionGridに、EditorStyle.radioButtonを追加すると
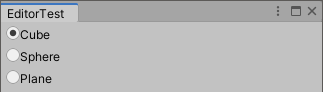
このように、見た目をラジオボタンへ変更することができます。
Script
GUILayout.SelectionGridを用いてラジオボタンを作成するScriptは以下の通りです。
using System.Collections;
using System.Collections.Generic;
using UnityEngine;
using UnityEditor;

public class EditorTest : EditorWindow
{
    private int selected = 0;

    [MenuItem("Tools/EditorTest")]
    public static void OpenWindow()
    {
        EditorWindow ed = EditorWindow.GetWindow(typeof(EditorTest), false, "EditorTest");
        ed.minSize = new Vector2(285, 456);
    }

    private void OnGUI()
    {
        string[] enum_name = { "Cube", "Sphere", "Plane" };
        GUIStyle style_radio = new GUIStyle(EditorStyles.radioButton);
        selected = GUILayout.SelectionGrid(selected, enum_name, 1, style_radio);
    }
}
GUIStyle.Drawを用いて作成
ラベル色の変更などができるように、GUIStyle.Drawを用いてラジオボタンを作成しました。
Script
GUIStyle.Drawを用いて作成するラジオボタンのScriptは以下の通りです。
public int RadioButton(string[] labels, int selected, GUIStyle style_label, GUIStyle style_radio, Event ev)
{
    int length = labels.Length;
    int margin = 3;
    int button_size = style_radio.normal.background.width;

    GUIStyle style_label_temp = new GUIStyle(style_label);

    Vector2 mouse_pos = ev.mousePosition;

    for (int i = 0; i < length; i++)
    {
        int control_id = GUIUtility.GetControlID(FocusType.Keyboard);
        Rect rect_control = GUILayoutUtility.GetRect(GUIContent.none, style_radio);
        Rect rect_button = new Rect(rect_control) { width = button_size };
        Rect rect_label = new Rect(rect_control) { x = rect_button.width + margin, width = rect_control.width - rect_button.width - margin };

        switch (ev.type)
        {
            case EventType.MouseDown:
                if (rect_control.Contains(mouse_pos))
                {
                    selected = i;
                    GUIUtility.keyboardControl = control_id;
                    Repaint();
                }
                break;
        }

        style_label_temp.normal = style_label.normal;
        if (GUIUtility.keyboardControl == control_id)
        {
            style_label_temp.normal = style_label.focused;
        }

        GUI.Label(rect_label, labels[i], style_label_temp);

        //radio button
        bool button_on = false;
        if (ev.type == EventType.Repaint)
        {
            if (i == selected)
            {
                button_on = true;
            }
            style_radio.Draw(rect_button, GUIContent.none, control_id, button_on);
        }
    }

    return selected;
}
ラジオボタンを作成する上で表示するラベル(labels)からラジオボタンの数を取得します。また、ラジオボタンとラベルの隙間(margin)を決めておきます。次に、GUIStyleからラジオボタンの大きさを取得します(button_size)。
int length = labels.Length;
int margin = 3;
int button_size = style_radio.normal.background.width;
ラベルのスタイルを変更するために使用するGUIStyleを作成します。また、Eventからマウスの位置を取得します(mouse_pos)。
GUIStyle style_label_temp = new GUIStyle(style_label);

Vector2 mouse_pos = ev.mousePosition;
for文内でラジオボタンを作成します。GUIUtility.GetControlIDによりラジオボタンに設定するidを取得し(control_id)、GUILayoutUtility.GetRectでコントロールで使用するRectを取得します。このRectからlabelとボタン部分のRectを計算します。
int control_id = GUIUtility.GetControlID(FocusType.Keyboard);
Rect rect_control = GUILayoutUtility.GetRect(GUIContent.none, style_radio);
Rect rect_button = new Rect(rect_control) { width = button_size };
Rect rect_label = new Rect(rect_control) { x = rect_button.width + margin, width = rect_control.width - rect_button.width - margin };
EventType.MouseDownとRect.Containsを用いてラジオボタンがクリックされたかを判定します。クリックされた場合は、出力するインデックス(selected)を取得します。また、キーボードでフォーカスされているidにクリックされたラジオボタンのidを渡します。また、Repaint()によって再描画を行います。
switch (ev.type)
{
    case EventType.MouseDown:
        if (rect_control.Contains(mouse_pos))
        {
            selected = i;
            GUIUtility.keyboardControl = control_id;
            Repaint();
        }
        break;
}
クリックされたラジオボタンのラベル色を変更します。変更したGUIStyle(style_label_temp)と先ほど求めたlabelのRectを用いてlabelを作成します。
style_label_temp.normal = style_label.normal;
if (GUIUtility.keyboardControl == control_id)
{
    style_label_temp.normal = style_label.focused;
}

GUI.Label(rect_label, labels[i], style_label_temp);
最後にラジオボタンのボタン部分をGUIStyle.Drawを用いて作成します。ラジオボタンのインデックスが選択されているラジオボタンのインデックス(selected)と等しいとき、button_on=tureとすることでラジオボタンが選択された状態の画像で描画されるようにしています。
bool button_on = false;
if (ev.type == EventType.Repaint)
{
    if (i == selected)
    {
        button_on = true;
    }
    style_radio.Draw(rect_button, GUIContent.none, control_id, button_on);
}
実行結果
GUIStyle.Drawを用いて作成したラジオボタンを実行するScriptは以下の通りです。
using System.Collections;
using System.Collections.Generic;
using UnityEngine;
using UnityEditor;

public class EditorTest : EditorWindow
{
    private int selected = 0;

    [MenuItem("Tools/EditorTest")]
    public static void OpenWindow()
    {
        EditorWindow ed = EditorWindow.GetWindow(typeof(EditorTest), false, "EditorTest");
        ed.minSize = new Vector2(285, 456);
    }

    private void OnGUI()
    {
        Event event_current = Event.current;

        GUIStyle style_label = new GUIStyle(GUI.skin.label);
        style_label.focused.textColor = Color.blue;
        GUIStyle style_radio = new GUIStyle(EditorStyles.radioButton);

        string[] enum_name = { "Cube", "Sphere", "Plane" };
        selected = selected = RadioButton(enum_name, selected, style_label, style_radio, event_current);
    }

    public int RadioButton(string[] labels, int selected, GUIStyle style_label, GUIStyle style_radio, Event ev)
    {
       ・・・
    }
}
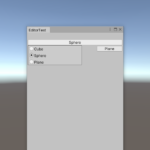
このScriptを実行すると以下のようになります。問題なく動作していることが分かります。

-
前の記事
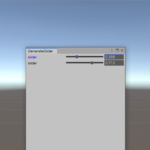
Sliderの作成(Editor拡張)2020/08/31修正 2020.06.07
-
次の記事
ポップアップウィンドウの作成(Editor拡張) 2020.07.08