波動方程式を用いた波紋の作成(2019/11/09修正)
Shaderで波動方程式を用いて波紋をシミュレートしてみました。
波動方程式
波動方程式は以下の通りです。
$$ \frac{1}{s^2}\frac{\partial ^2u}{\partial t^2}=\frac{\partial ^2u}{\partial x^2}+\frac{\partial ^2u}{\partial y^2} $$離散化した波動方程式
上記の方程式のままではshaderで処理することはできません。そこで上式を差分化及び離散化すると
$$ \begin{align} u(t+1,x,y)=&s^2\{u(t,x-1,y)+u(t,x+1,y)\\ &+u(t,x,y-1)+u(t,x,y+1)-4u(t,x,y)\}\\ &+2u(t,x,y)-u(t-1,x,y) \end{align} $$と表せます。この式を用いて波紋をシミュレートします。
Shader
波紋計算用shader
波紋をシミュレートするためのShaderはこちらです。色は0~1の値をとります。しかし、波の上下を表すにはマイナスの値も必要です。そこで、2を掛けたのちに1を引くことで0~1を-1~1へ変更し、計算しています。また、テクスチャの赤色に計算結果を、緑色に一つ前の状態を書き込んでいます。
Shader "Unlit/Wave"
{
	Properties
	{
		_MainTex ("Texture", 2D) = "black" {}
		_PhaseVelocity("PhaseVelocity", Range(0, 0.5)) = 0.1
		_Attenuation ("Attenuation ", Range(0.9, 1.0)) = 1.0
		_DeltaUV("Delta UV", Float) = 1
	}
	SubShader
	{
		Tags { "RenderType"="Opaque" }

		Pass
		{
			CGPROGRAM
			#pragma vertex vert
			#pragma fragment frag

			#include "UnityCG.cginc"

			struct appdata
			{
				float4 vertex : POSITION;
				float2 uv : TEXCOORD0;
			};

			struct v2f
			{
				float2 uv : TEXCOORD0;
				float4 vertex : SV_POSITION;
			};

			sampler2D _MainTex;
			float4 _MainTex_ST;
			float4 _MainTex_TexelSize;
			float _PhaseVelocity;
			float _Attenuation;
			float _DeltaUV;

			v2f vert (appdata v)
			{
				v2f o;
				o.vertex = UnityObjectToClipPos(v.vertex);
				o.uv = TRANSFORM_TEX(v.uv, _MainTex);
				return o;
			}

			fixed4 frag (v2f i) : SV_Target
			{
				float2 coord = i.uv;
				float4 col = tex2D(_MainTex, coord);
				float3 duv = float3(_MainTex_TexelSize.x, _MainTex_TexelSize.y, 0) * _DeltaUV;

				float dh = tex2D(_MainTex, coord + duv.xz).r + tex2D(_MainTex, coord - duv.xz).r
						+ tex2D(_MainTex, coord + duv.zy).r + tex2D(_MainTex, coord - duv.zy).r
						- 4 * col.r;
				dh = (2 * (col.r * 2 - col.g + dh * _PhaseVelocity) - 1) * _Attenuation;
				dh = (dh + 1) * 0.5;
				return float4(dh, col.r, 0, 0);
			}
			ENDCG
		}
	}
}
画像合成用shader
以前、記事にした画像合成用shaderを利用しています。詳しくはこちらに掲載しています。このshaderで任意の画像を合成することで、水面に外力を加えることができます。そのため、そこから新たな波紋が発生します。
Shader "Unlit/Paint"
{
	Properties
	{
		_MainTex ("Texture", 2D) = "white" {}
		_PaintTex ("BlushTexture", 2D) = "white" {}
		_UVPosition ("UV Position", VECTOR) = (0.5, 0.5, 0, 0)
		_Size ("PaintSize", Range(0.001, 0.5)) = 0.1
	}
	SubShader
	{
		Tags { "RenderType"="Transparent" "Queue"="Transparent" }

	ZWrite Off
        Blend SrcAlpha OneMinusSrcAlpha

		Pass
		{
			CGPROGRAM
			#pragma vertex vert
			#pragma fragment frag

			#include "UnityCG.cginc"

			struct appdata
			{
				float4 vertex : POSITION;
				float2 uv : TEXCOORD0;
			};

			struct v2f
			{
				float2 uv : TEXCOORD0;
				float4 vertex : SV_POSITION;
			};

			sampler2D _MainTex;
			sampler2D _PaintTex;
			float4 _MainTex_ST;
			float4 _PaintTex_ST;
			float4 _UVPosition;
			float _Size;

			v2f vert (appdata v)
			{
				v2f o;
				o.vertex = UnityObjectToClipPos(v.vertex);
				o.uv = TRANSFORM_TEX(v.uv, _MainTex);
				return o;
			}

			fixed4 frag (v2f i) : SV_Target
			{
				float com;
				com = step(_UVPosition.x - _Size, i.uv.x);
				com = step(i.uv.x, _UVPosition.x + _Size) * com;
				com = step(_UVPosition.y - _Size, i.uv.y) * com;
				com = step( i.uv.y, _UVPosition.y + _Size) * com;

				fixed4 col_1 = tex2D(_MainTex, i.uv);
				fixed4 col_2 = tex2D(_PaintTex, (i.uv - (_UVPosition - _Size)) * 0.5 / _Size);

				col_2.a = col_2.a * com;
				fixed alpha = col_2.a + (1 - col_2.a) * col_1.a;
				fixed4 col = fixed4((col_2.rgb * col_2.a + (col_1.rgb * col_1.a * (1 - col_2.a))) / alpha, alpha);

				 return col;
			}
			ENDCG
		}
	}
}
初期化用shader
レンダーテクスチャを初期化する際に使用するshaderです。
Shader "Unlit/GenerateGrayTexture"
{
    Properties
    {
        _MainTex ("Texture", 2D) = "white" {}
    }
    SubShader
    {
        Tags { "RenderType"="Opaque" }

        Pass
        {
            CGPROGRAM
            #pragma vertex vert
            #pragma fragment frag

            #include "UnityCG.cginc"

            struct appdata
            {
                float4 vertex : POSITION;
                float2 uv : TEXCOORD0;
            };

            struct v2f
            {
                float2 uv : TEXCOORD0;
                float4 vertex : SV_POSITION;
            };

            sampler2D _MainTex;
            float4 _MainTex_ST;

            v2f vert (appdata v)
            {
                v2f o;
                o.vertex = UnityObjectToClipPos(v.vertex);
                o.uv = TRANSFORM_TEX(v.uv, _MainTex);
                return o;
            }

            fixed4 frag (v2f i) : SV_Target
            {
                float4 col;
				col.rgb = 0.5;
				col.a = 1.0;
                return col;
            }
            ENDCG
        }
    }
}
Script
このScriptを平面のオブジェクトにアタッチすることで、その平面に波紋を発生させることができます。waveMatには波紋計算用のshaderを選択したMaterialを、matPaintには画像合成用のshaderを選択したMaterialを、mat_gray_texにはレンダーテクスチャの初期化用shaderを選択したMaterialを割り当てます。texBlushには外力を与えるための画像を割り当てます。ここでは、Default-Particleを使用しました。
左クリックをした場所のUV座標を検出しています。そして、その場所へGraphics.BlitでtexBlushを画像合成用のMaterialで波紋用のRenderTextureに合成しています。次に、このRenderTextureを、Graphics.Blitによって波紋を計算するためのMaterialへ渡します。これによって得られたRenderTextureをオブジェクトに設定されたMaterialへ渡し、波紋を表示しています。波紋の表示には、渡されたテクスチャの赤色を白黒に表示するshaderを作成し、使用しています。
using System.Collections;
using System.Collections.Generic;
using UnityEngine;
using UnityEngine.UI;

public class WaveGnerator : MonoBehaviour {

    public Material waveMat, matPaint;
    public Material mat_gray_tex;    //2019/11/09追加
    public Texture texBlush;
    public int TextureSize = 256;
    public Texture tex_circle, tex_star;
    public Slider slider_blushsize, slider_phasevelocity, slider_attenuation, slider_bump_scale;
    public Toggle toggle_none, toggle_circle, toggle_star;
    public Button button_init;
    private Material mat;
    private RenderTexture rTex;
    private Camera mainCam;
    private float rayDist = 100f;

    // Use this for initialization
    void Start()
    {
        mainCam = Camera.main;
        mat = gameObject.GetComponent().material;
        rTex = new RenderTexture(TextureSize, TextureSize, 0, RenderTextureFormat.RGFloat, RenderTextureReadWrite.Default);

        //2019/11/09修正前
        //Texture2D texBuf = new Texture2D(1, 1);
        //texBuf.SetPixel(0, 0, new Color(0.5f, 0.5f, 0, 1));
        //texBuf.Apply();
        //Graphics.Blit(texBuf, rTex);

        //2019/11/07修正後
        Texture2D texBuf = new Texture2D(1, 1);
        texBuf.SetPixel(0, 0, new Color(1.0f, 1.0f, 1.0f, 1));
        texBuf.Apply();
        Graphics.Blit(texBuf, rTex, mat_gray_tex);

        waveMat.SetTexture("_MainTex", rTex);
        waveMat.SetTexture("_MaskTex", null);
        matPaint.SetTexture("_PaintTex", texBlush);
        mat.SetTexture("_HeightMap", rTex);

        if (slider_blushsize != null)
        {
            slider_blushsize.value = 0.2f;
            slider_phasevelocity.value = 0.4f;
            slider_attenuation.value = 0.99f;
            matPaint.SetFloat("_Size", Mathf.Max(slider_blushsize.value * 0.5f, 0.01f));
            waveMat.SetFloat("_PhaseVelocity", slider_phasevelocity.value * 0.5f);
            waveMat.SetFloat("_Attenuation", slider_attenuation.value * 0.1f + 0.9f);
        }

        if (toggle_none != null)
        {
            toggle_none.onValueChanged.AddListener((flg) =>
            {
                waveMat.SetTexture("_MaskTex", null);
            });
            toggle_circle.onValueChanged.AddListener((flg) =>
            {
                waveMat.SetTexture("_MaskTex", tex_circle);
            });
            toggle_star.onValueChanged.AddListener((flg) =>
            {
                waveMat.SetTexture("_MaskTex", tex_star);
            });
        }

        if (button_init != null)
        {
            button_init.onClick.AddListener(() =>
            {
                //2019/11/07修正前
                //Texture2D buf = new Texture2D(1, 1);
                //buf.SetPixel(0, 0, new Color(0.5f, 0.5f, 0, 1));
                //buf.Apply();
                //Graphics.Blit(buf, rTex);
                //waveMat.SetTexture("_MainTex", rTex);

                //2019/11/07修正後
                Texture2D buf = new Texture2D(1, 1);
                texBuf.SetPixel(0, 0, new Color(1.0f, 1.0f, 1.0f, 1));
                texBuf.Apply();
                Graphics.Blit(texBuf, rTex, mat_gray_tex);
            });
        }

        if (slider_bump_scale != null)
        {
            slider_bump_scale.value = 1.0f;
            slider_bump_scale.minValue = 0.0f;
            slider_bump_scale.maxValue = 20.0f;
            mat.SetFloat("_BumpScale", slider_bump_scale.value);
        }
    }

    //UV座標検出
    private Vector2 UVDetector(RaycastHit hitInfo)
    {
        bool pass = false;
        Mesh mesh = hitInfo.collider.gameObject.GetComponent().sharedMesh;
        int[] index = mesh.triangles;
        Vector3[] vert = mesh.vertices;
        Vector3 pos = hitInfo.transform.InverseTransformPoint(hitInfo.point);
        for (int i = 0; i < index.Length; i += 3)
        {
            Vector3 p1 = vert[index[i]];
            Vector3 p2 = vert[index[i + 1]];
            Vector3 p3 = vert[index[i + 2]];

            //クリックしたポイントがメッシュの同一平面上に存在するか
            float val = Vector3.Dot(Vector3.Cross(p2 - p1, p3 - p1), pos - p1);
            pass = (val > -0.000001f && val < 0.000001f);

            //クリックしたポイントがメッシュ内に存在するか
            if (pass)
            {
                Vector3 pcp1 = Vector3.Cross(pos - p1, p2 - p1).normalized;
                Vector3 pcp2 = Vector3.Cross(pos - p2, p3 - p2).normalized;
                Vector3 pcp3 = Vector3.Cross(pos - p3, p1 - p3).normalized;

                float d12 = Vector3.Dot(pcp1, pcp2);
                float d23 = Vector3.Dot(pcp2, pcp3);

                pass = (d12 > 0.999f && d23 > 0.999f);

                //クリックしたポイントが返上か否か
                if (!pass)
                {
                    if (0.999f <= Vector3.Dot((p1 - pos).normalized, (pos - p2).normalized))
                    {
                        return OnLineUV(mesh, pos, p1, p2, i, i + 1);
                    }
                    else if (0.999f <= Vector3.Dot((p2 - pos).normalized, (pos - p3).normalized))
                    {
                        return OnLineUV(mesh, pos, p2, p3, i + 1, i + 2);
                    }
                    else if (0.999f <= Vector3.Dot((p3 - pos).normalized, (pos - p1).normalized))
                    {
                        return OnLineUV(mesh, pos, p3, p1, i + 2, i);
                    }
                }
            }

            //uv座標の算出
            if (pass)
            {
                Vector3 uv1 = mesh.uv[mesh.triangles[i]];
                Vector3 uv2 = mesh.uv[mesh.triangles[i + 1]];
                Vector3 uv3 = mesh.uv[mesh.triangles[i + 2]];

                Vector3 f1 = p1 - pos;
                Vector3 f2 = p2 - pos;
                Vector3 f3 = p3 - pos;

                float a = Vector3.Cross(p1 - p2, p1 - p3).magnitude;
                float a1 = Vector3.Cross(f2, f3).magnitude / a;
                float a2 = Vector3.Cross(f3, f1).magnitude / a;
                float a3 = Vector3.Cross(f1, f2).magnitude / a;

                Vector2 uv = uv1 * a1 + uv2 * a2 + uv3 * a3;

                return uv;
            }
        }
        return new Vector2(-1, -1);
    }

    Vector2 OnLineUV(Mesh mesh, Vector3 v, Vector3 v1, Vector3 v2, int n1, int n2)
    {
        Vector3 uv1 = mesh.uv[mesh.triangles[n1]];
        Vector3 uv2 = mesh.uv[mesh.triangles[n2]];
        float m = (v - v1).magnitude;
        float n = (v2 - v).magnitude;
        Vector3 uv = (n * uv1 + m * uv2) / (m + n);
        return uv;
    }

    // Update is called once per frame
    void Update()
    {
        RaycastHit hitInfo = new RaycastHit();
        //2019/11/09修正前
        //RenderTexture buf = RenderTexture.GetTemporary(rTex.width, rTex.height);
        //2019/11/07修正後
        RenderTexture buf = RenderTexture.GetTemporary(rTex.width, rTex.height, 0, RenderTextureFormat.RGFloat);

        if (Input.GetMouseButton(0))
        {
            Ray ray = mainCam.ScreenPointToRay(Input.mousePosition);
            if (Physics.Raycast(ray, out hitInfo, rayDist))
            {
                Vector2 UVPos = UVDetector(hitInfo);
                matPaint.SetTexture("_MainTex", rTex);
                matPaint.SetVector("_UVPosition", new Vector4(UVPos.x, UVPos.y, 0, 0));
                Graphics.Blit(rTex, buf, matPaint);
                Graphics.Blit(buf, rTex);
            }
            if (slider_blushsize != null)
            {
                matPaint.SetFloat("_Size", Mathf.Max(slider_blushsize.value * 0.5f, 0.01f));
                waveMat.SetFloat("_PhaseVelocity", slider_phasevelocity.value * 0.5f);
                waveMat.SetFloat("_Attenuation", slider_attenuation.value * 0.1f + 0.9f);
            }

            if (slider_bump_scale != null)
            {
                mat.SetFloat("_BumpScale", slider_bump_scale.value);
            }
        }
        Graphics.Blit(rTex, buf, waveMat);
        Graphics.Blit(buf, rTex);
        RenderTexture.ReleaseTemporary(buf);
    }
}
波紋が広がるエリアの設定
このままでは、四角い領域でしか波紋が作成できません。そこで、自由な領域で波紋を発生させるために波紋計算用shaderへ新たに処理を追加しました。波紋を発生させたい場所を白色、発生させたくない場所を黒色としたテクスチャを新たに作成し、このテクスチャによって波紋が発生する領域を変更できるようにしました。
Shader "Unlit/Wave"
{
	Properties
	{
		_MainTex ("Texture", 2D) = "black" {}
		_PhaseVelocity("PhaseVelocity", Range(0, 0.5)) = 0.1
		_Attenuation ("Attenuation ", Range(0.9, 1.0)) = 1.0
		_MaskTex ("WaveAreaTexture" , 2D) = "white" {}
		_DeltaUV("Delta UV", Float) = 1
	}
	SubShader
	{
		Tags { "RenderType"="Opaque" }

		Pass
		{
			CGPROGRAM
			#pragma vertex vert
			#pragma fragment frag

			#include "UnityCG.cginc"

			struct appdata
			{
				float4 vertex : POSITION;
				float2 uv : TEXCOORD0;
			};

			struct v2f
			{
				float2 uv : TEXCOORD0;
				float4 vertex : SV_POSITION;
			};

			sampler2D _MainTex;
			float4 _MainTex_ST;
			float4 _MainTex_TexelSize;
			float _PhaseVelocity;
			float _Attenuation;
			float _DeltaUV;
			sampler2D _MaskTex;
			float4 _MaskTex_ST;

			v2f vert (appdata v)
			{
				v2f o;
				o.vertex = UnityObjectToClipPos(v.vertex);
				o.uv = TRANSFORM_TEX(v.uv, _MainTex);
				return o;
			}

			fixed4 frag (v2f i) : SV_Target
			{
				float2 coord = i.uv;
				float4 col = tex2D(_MainTex, coord);
				float3 duv = float3(_MainTex_TexelSize.x, _MainTex_TexelSize.y, 0) * _DeltaUV;

				float dh = tex2D(_MainTex, coord + duv.xz).r + tex2D(_MainTex, coord - duv.xz).r
						+ tex2D(_MainTex, coord + duv.zy).r + tex2D(_MainTex, coord - duv.zy).r
						- 4 * col.r;
				dh = (2 * (col.r * 2 - col.g + dh * _PhaseVelocity) - 1) * _Attenuation;
				dh = (dh * tex2D(_MaskTex, i.uv).r + 1) * 0.5;
				return float4(dh, col.r, 0, 0);
			}
			ENDCG
		}
	}
}
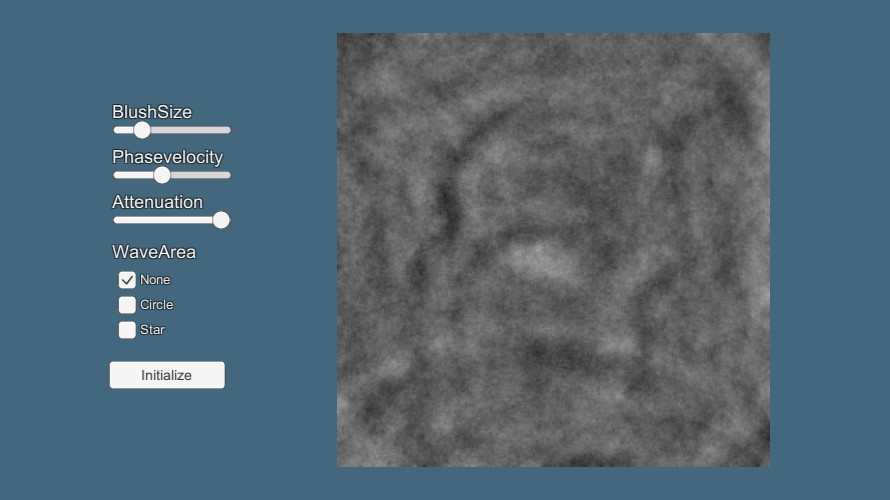
実行結果
BlushSizeで力を加えるための画像の大きさを変更できます。Phasevelocityは波紋が伝わる速さ、Attenuationは減衰率を調整できます。また、WaveAreaで波紋が発生する領域を変更することができます。Initializeボタンを押すと、波紋の発生していない状態に戻すことができます。
修正履歴
Scriptの修正
・レンダーテクスチャ(rTex)を初期化際に0.5を書き込めていなかった問題の修正(詳しくはこちら)
・RenderTexture.GetTemporaryでテクスチャフォーマットを指定していなかったため、floatで処理できていなかった問題の修正
参考サイト
しゅみぷろ:任意の点がモデル表面上に存在する場合にその位置のUVを算出する
Processingでシミュレーション~波動方程式
-
前の記事
平面の鏡面反射 2018.10.17
-
次の記事

Tessellationを用いた波紋の作成 2018.11.04