InputSystemで入力を取得(Entity Component System)
キー入力(WASDキー)をInputSystemから取得してCubeを動かします。
Script
Component
Cubeの移動速度を決めるComponentです。
using Unity.Entities;

namespace EmptyCan
{
    public struct Player : IComponentData
    {
        public float Speed;
    }
}
取得したキー入力を渡すためのComponentです。
using Unity.Entities;
using Unity.Mathematics;

namespace EmptyCan
{
    public struct InputsData : IComponentData
    {
        public float2 PlayerMove;
    }
}
以上のComponentを追加したEntityを作成します。
using Unity.Entities;
using UnityEngine;

namespace EmptyCan
{
    public class PlayerAuthoring : MonoBehaviour
    {
        public float Speed;

        class Baker : Baker<PlayerAuthoring>
        {
            public override void Bake(PlayerAuthoring authoring)
            {
                Player data = new Player() { Speed = authoring.Speed };
                var entity = GetEntity(TransformUsageFlags.Dynamic);
                AddComponent(entity, data);
                AddComponent(entity, new InputsData());
            }
        }
    }
}
System
ISystemはマネージドなフィールドを持つことができません。よって、InputSystemを利用する際にはSystemBaseを使います。
using UnityEngine;
using Unity.Entities;

namespace EmptyCan
{
    [UpdateInGroup(typeof(InitializationSystemGroup), OrderLast = true)]
    public partial class PlayerInputSystem : SystemBase
    {
        InputControls _input_controls;

        protected override void OnCreate()
        {
            _input_controls = new InputControls();
        }

        protected override void OnStartRunning()
        {
            _input_controls.Enable();
        }

        protected override void OnUpdate()
        {
            foreach (RefRW<InputsData> data in SystemAPI.Query<RefRW<InputsData>>())
            {
                data.ValueRW.PlayerMove = _input_controls.PlayerMap.PlayerMove.ReadValue<Vector2>();
            }
        }

        protected override void OnStopRunning()
        {
            _input_controls.Disable();
        }

        protected override void OnDestroy()
        {
            _input_controls.Disable();
            _input_controls.Dispose();
        }
    }
}
取得した入力によりCubeを動かします。
using Unity.Burst;
using Unity.Entities;
using Unity.Mathematics;
using Unity.Transforms;
using UnityEngine;

namespace EmptyCan
{
    [UpdateBefore(typeof(TransformSystemGroup))]
    public partial struct PlayerSystem : ISystem
    {
        [BurstCompile]
        public void OnUpdate(ref SystemState state)
        {
            foreach (var (data, inputs, transform) in SystemAPI.Query<RefRO<Player>, RefRO<InputsData>, RefRW<LocalTransform>>())
            {
                float3 position = transform.ValueRO.Position;
                position.xy += inputs.ValueRO.PlayerMove.xy * data.ValueRO.Speed * SystemAPI.Time.DeltaTime;
                transform.ValueRW.Position = position;
                Debug.Log($"{inputs.ValueRO.PlayerMove.xy}");
            }
        }
    }
}
Debug.Log
BurstCompileを利用する場合、文字列リテラル、string.Format及びfixed stirngを使用する必要があります。詳しくはUnity, 文字列のサポートを参照してください。
Debug.Log("input");
Debug.Log(string.Format("{0}", inputs.ValueRO.PlayerMove.xy));
Debug.Log($"{inputs.ValueRO.PlayerMove.xy}");
Systemの実行順
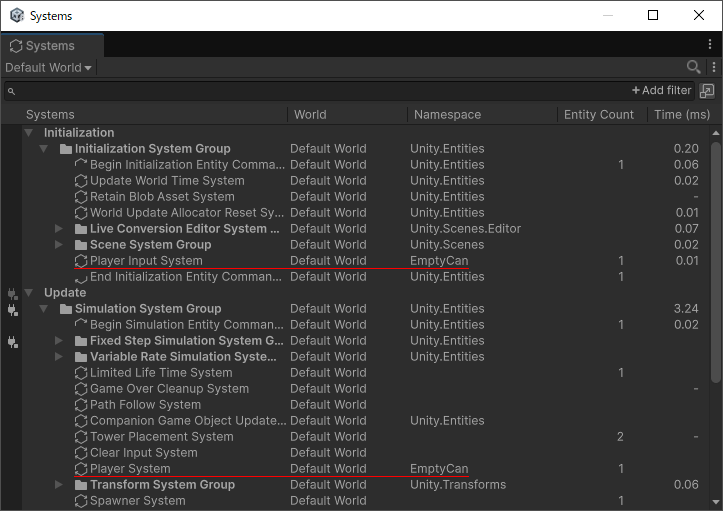
Systemの実行順序を適切に設定する必要があります。例えば、PlayerSystemが実行されてからPlayerInputSystemが動いた場合、PlayerSystemは入力を受け取れません。よって、PlayerInputSystemの後にPlayerSystemが実行されるようにしなければなりません。また、オブジェクトの移動等はTransformの更新を行うSystemの前に実行する必要があります。そのため、適切なタイミングでSystemが実行されるように属性を指定します。今回は以下のように設定しています。
PlayerInputSystem
InitializationSystemGroupはUpdateの前に実行されます。OrderLast = trueによりInitializationSystemGroupの最後に実行されるようになっています。
[UpdateInGroup(typeof(InitializationSystemGroup), OrderLast = true)]PlayerSystem
PlayerSystemはCubeの位置を変更します。よって、Transformに変更を加えるのでTransformSystemが更新される前に実行します。
[UpdateBefore(typeof(TransformSystemGroup))]Systemの確認方法
Window→Entities→Systemより開くとこができるWIndowによって実行されているSystemを確認することができます。それぞれのSystemが指定されたタイミングで実行されていることが確認できます。
InputSystem
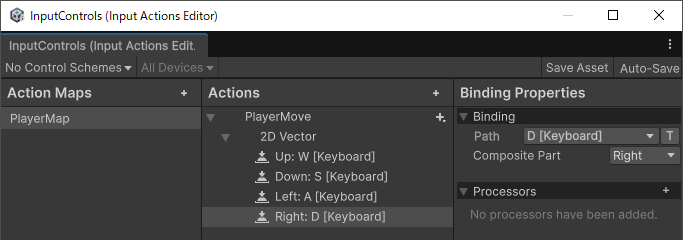
InputSystemを用いてPlayerInputSystemで入力を受け取っています。InputSytemはPackageManagerからインストールする必要があります。インストール後はCreateメニューにInput Actionsが追加されます。そこから、Input Actionを作成します。作成したInput Actionをダブルクリックすることでエディターを開くことができます。このエディターで各種入力に関する設定を行います。今回はWASDキーに割り当てを行います。
ActionMapを追加し、名前をPlayerMapに変更します。

New actionの名前をPlayerMoveへ変更し、ActionTypeをValueと設定します。また、Bindingは不要なので削除します。

Add Up¥Down¥Left¥Right CompositeよりCompositeを追加します。

BindingのPathへ使用したいキーを割り当て、保存します。自動的にScriptが生成されるので、このScriptを用いてキー入力を受け取ります。
設定と実行結果
SubeSceneにCube(Player)を作成します。そのCubeへPlayerAuthoringを追加します。
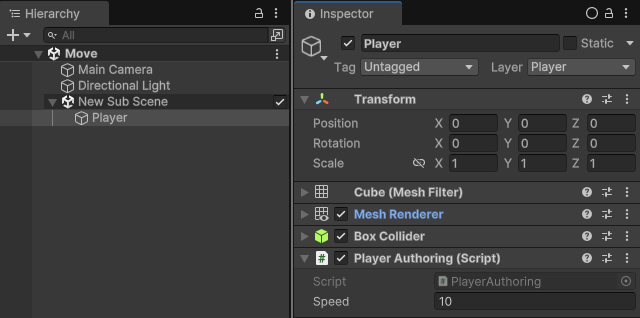
実行するとWASDキーでCubeを動かすことができます。

参考ページ
テラシュールブログ,【Unity】ECSのComponentSystem実行順をコントロールする
ねこじゃらシティ,【Unity】Input Systemの使い方入門
Turbo Makes Games, Data-Oriented Input in Unity ECS – DOTS + Input System 2023
-
前の記事
PrefabからEntityを生成(Entity Component System) 2025.01.13
-
次の記事
当たり判定(Entity Component System) 2025.01.30


コメントを書く